
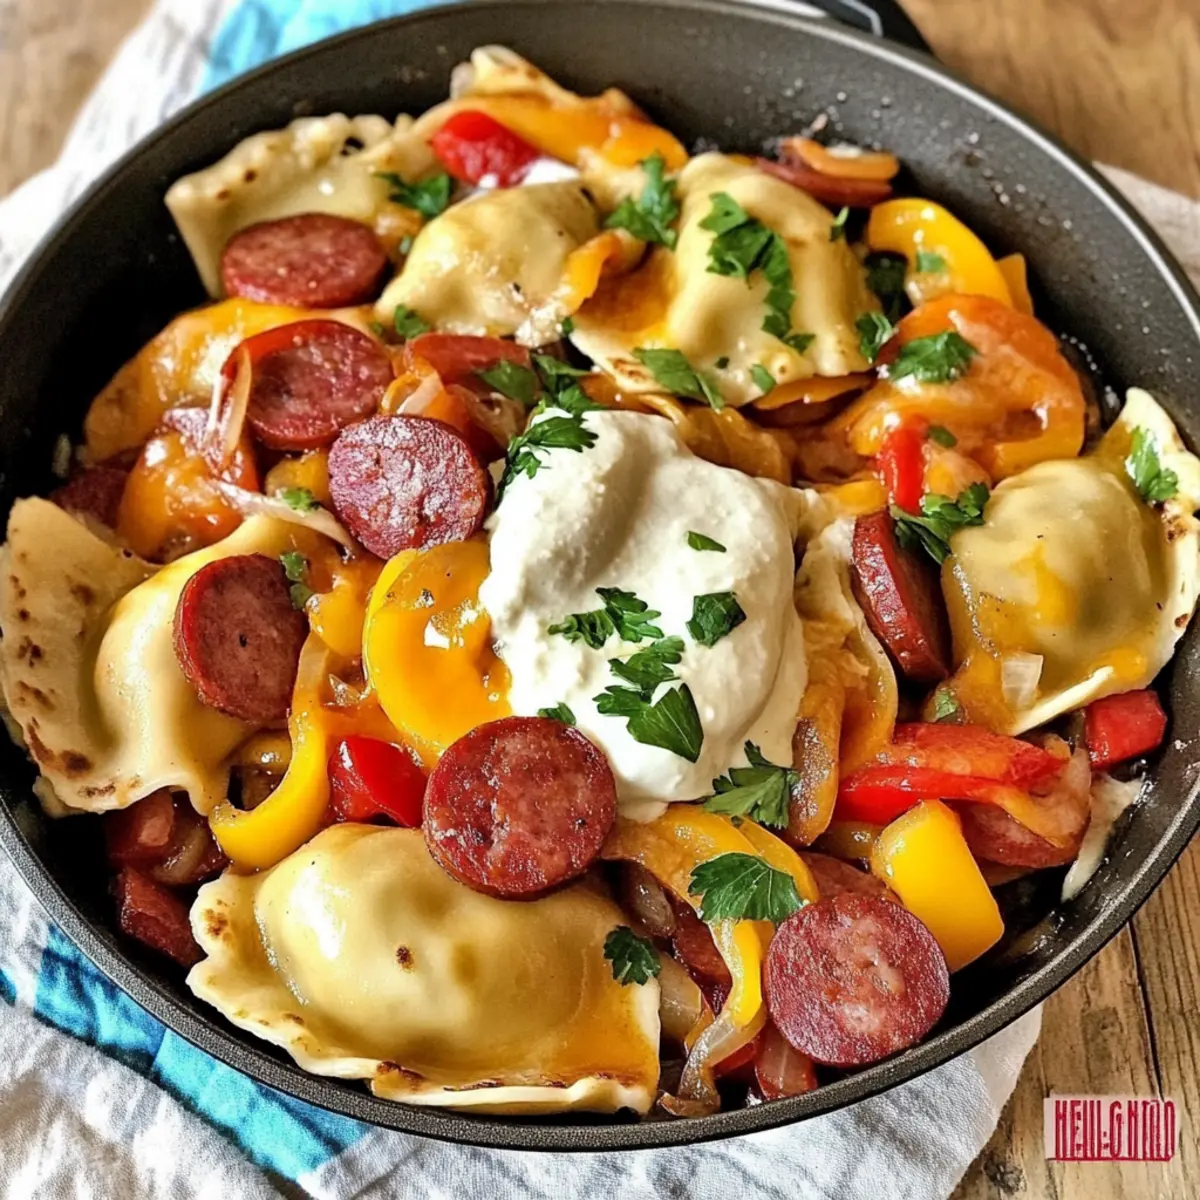
As I lifted the lid off my skillet, the fragrant medley of sautéed onions, vibrant bell peppers, and savory kielbasa rushed up like a warm hug on a chilly day. There’s something truly magical about the Easy Pierogies and Kielbasa Skillet—this comforting dish is not only an absolute crowd-pleaser, but it also comes together in just 30 minutes, making it the perfect answer to hectic weeknights. The golden-brown pierogies nestled among the juicy kielbasa and melted cheddar create an inviting scene that immediately beckons you to dig in. Best of all, this recipe embraces versatility, allowing you to sneak in your favorite vegetables while keeping dinner both simple and delightful. Ready to transform your dinner routine? Let’s get cooking!

Why Is This Skillet Recipe a Must-Try?
Simplicity: With just one skillet and minimal prep, this dish makes home cooking a breeze.
Flavor Fusion: The combination of caramelized onions, savory kielbasa, and crispy pierogies is a flavor fiesta that you’ll crave.
Quick Cooking: Ready in only 30 minutes, this recipe is perfect for busy weeknights, letting you enjoy a hearty meal without the fuss.
Versatile Ingredients: Don’t hesitate to customize! Toss in your favorite vegetables or swap kielbasa for chicken sausage to keep it fresh and exciting.
Crowd-Pleaser: Ideal for family dinners, this dish has a charm that brings everyone to the table, reminiscent of comfort food classics. Check out more options like Vegan Quesadillas with Black Beans and Avocado for more weeknight inspirations!
Pierogies and Kielbasa Skillet Ingredients
For the Skillet
- Olive Oil – Essential for frying the kielbasa and veggies; feel free to substitute with vegetable oil for a lighter option.
- Kielbasa (14 ounces) – Brings that rich, savory flavor; turkey kielbasa works beautifully if you’re looking for a leaner choice.
- Bell Peppers (3, assorted colors) – Adds sweetness and color; grab any color that catches your eye for variety.
- Onion (1 medium) – Provides depth and sweetness; shallots can offer a milder flavor if you prefer.
- Pierogies (12 count) – The hearty base of the dish and can be onion or cheddar flavor; mini pierogies might be easier to sauté.
- Butter (1 tablespoon) – Perfect for browning those golden pierogies; swap it out for more olive oil to go dairy-free.
- Shredded Cheddar Cheese (⅓ cup) – Melts beautifully atop the dish for added flavor; mozzarella or dairy-free cheese can be used as alternatives.
- Sour Cream (optional) – A luscious topping for extra creaminess; Greek yogurt can also be a delightful substitute.
Step‑by‑Step Instructions for Pierogies and Kielbasa Skillet
Step 1: Prepare to Boil
Begin by filling a large pot with water and bringing it to a boil over high heat. This pot will be used to cook the pierogies, so don’t forget to add a pinch of salt to the water for extra flavor. Once boiling, reduce the heat to medium; you want to keep it at a gentle simmer while you prepare the other ingredients.
Step 2: Brown the Kielbasa
In a large skillet, heat 1 tablespoon of olive oil over medium-high heat until shimmering. Add sliced kielbasa to the skillet in a single layer, allowing it to cook undisturbed for about 3-4 minutes until browned. Flip the kielbasa using tongs and cook for another 2-3 minutes until evenly browned and crispy. Once done, remove it from the skillet and set it aside on a plate.
Step 3: Sauté the Vegetables
Lower the skillet temperature to medium, and in the same skillet, add another drizzle of olive oil if needed. Toss in sliced bell peppers and onions, sautéing them for about 10-15 minutes until they are tender and lightly caramelized. Stir occasionally to avoid sticking, and enjoy the lovely aroma as the veggies soften. Once ready, remove from heat and set aside with the kielbasa.
Step 4: Cook the Pierogies
Carefully add the frozen pierogies to the pot of simmering water. Cook according to the package instructions, which usually takes about 5-7 minutes until they float to the surface, indicating they are done. Remove them with a slotted spoon and drain well, ensuring there’s no excess water left.
Step 5: Brown the Pierogies
Melt 1 tablespoon of butter in the same skillet over medium heat. Once melted and bubbling, add the drained pierogies in a single layer. Sauté them for about 3-4 minutes on one side until they develop a beautiful golden-brown crust. Gently flip them to brown the other side for another 2-3 minutes.
Step 6: Combine and Heat Through
Return the cooked kielbasa and sautéed peppers and onions to the skillet with the browned pierogies. Use a spatula to gently toss everything together, ensuring the pierogies are coated in the flavorful mixture. Cook for an additional 2-3 minutes to heat everything through and combine the delicious flavors.
Step 7: Melt the Cheese
Sprinkle shredded cheddar cheese evenly over the skillet mixture. Cover with a lid and allow it to cook for about 2-3 minutes until the cheese is melted and bubbly. Once melted, remove from the heat, and prepare to serve this delightful Pierogies and Kielbasa Skillet warm, topped with a dollop of sour cream if desired.

Make Ahead Options
These Pierogies and Kielbasa Skillet preparations are perfect for busy home cooks looking to save time! You can prep the kielbasa and sauté the vegetables (bell peppers and onions) up to 3 days in advance. Store them in an airtight container in the refrigerator to maintain their flavor and texture. Additionally, you can boil the pierogies (12 count) and refrigerate them for up to 24 hours. When you’re ready to serve, simply brown the pierogies in a skillet with melted butter, then add your prepped kielbasa and veggies. Top with shredded cheddar cheese to melt and enjoy restaurant-quality comfort food that’s just as delicious—perfect for hectic weeknights!
What to Serve with Easy Pierogies and Kielbasa Skillet
Imagine a cozy dinner table set for family and friends, where every bite is a celebration of comfort and flavor.
-
Crispy Green Salad: A fresh mix of greens with a zesty vinaigrette balances the rich flavors of the skillet dish. It adds a crunchy, light texture that revitalizes each forkful.
-
Garlic Bread: Warm, toasted slices of garlic bread provide a satisfying crunch and are perfect for mopping up that creamy sour cream. Plus, who can resist the fragrant aroma of garlic wafting through the air?
-
Roasted Vegetables: Try a vibrant medley of roasted carrots, zucchini, and Brussels sprouts. Their caramelized sweetness creates a delightful contrast to the savory pierogies and kielbasa, enhancing the overall experience.
-
Creamy Coleslaw: This tangy side offers a refreshing crunch and balances the dish’s warm comfort food vibes. The contrast of textures makes each bite even more enjoyable.
-
Homemade Applesauce: A hint of sweetness from applesauce can elevate your meal, playing perfectly against the savory kielbasa, creating a nostalgic combination reminiscent of family dinners.
-
Sweet Tea or Lemonade: Wash it all down with a refreshing glass of iced sweet tea or homemade lemonade, offering a cooling touch to complement your hearty meal.
-
Chocolate Chip Cookies: End your dinner on a sweet note! These beloved treats add a warm, comforting finish to your meal, ensuring everyone leaves with a smile.
How to Store and Freeze Pierogies and Kielbasa Skillet
Fridge: Store leftovers in an airtight container for up to 3–4 days. Make sure to allow the dish to cool completely before sealing to avoid condensation.
Freezer: If desired, freeze the Pierogies and Kielbasa Skillet for up to 3 months. Portion it into freezer-safe containers, ensuring they’re well sealed to prevent freezer burn.
Reheating: To enjoy, thaw overnight in the fridge, then reheat gently on the stovetop over low heat, adding a splash of water or broth to revive the moisture and texture.
Room Temperature: Avoid leaving the skillet out for more than 2 hours at room temperature to ensure food safety and best quality.
Pierogies and Kielbasa Skillet Variations
Feel free to tailor this comforting recipe to suit your taste buds and dietary needs!
-
Lean Protein: Swap kielbasa for turkey or chicken sausage for a healthier alternative that still packs a punch of flavor. The essence of the dish remains intact, yet feels lighter on the plate.
-
Veggie Medley: Add mushrooms, spinach, or zucchini to the sauté pan for extra nutrition and color. These vegetables will absorb and enhance the savory goodness of the kielbasa, creating a delightful melody of flavors!
-
Cheesy Goodness: Experiment with cheese by using mozzarella or a dairy-free alternative instead of cheddar. It melts beautifully while lending a different texture and taste to your skillet.
-
Creamy Twist: Replace sour cream with Greek yogurt for a protein boost and tangy flavor. This simple swap offers a slightly different mouthfeel while remaining creamy and delicious!
-
Herb Infusion: Boost the flavor profile by adding fresh herbs like parsley or dill before serving. They’ll add brightness and freshness, elevating the dish like a summery garden.
-
Spicy Kick: If you love some heat, throw in crushed red pepper or a dash of hot sauce while cooking for an exciting spicy twist! You’ll be surprised at how well it complements the savory kielbasa.
-
Mini Pierogies: For a fun twist, use mini pierogies! They cook quickly and are easier to manage, perfect for feeding little mouths or serving as bite-sized treats during gatherings.
-
Balsamic Surprise: Drizzle a bit of balsamic glaze over the finished dish for a tangy sweetness that perfectly complements the savory notes of kielbasa and cheese!
Looking for more ways to enjoy comfort food? Check out Egg Cheese Roll for another delicious twist on a classic!
Helpful Tricks for Pierogies and Kielbasa Skillet
-
Watch Your Timing: Cooking the kielbasa and vegetables too long can lead to mushiness. Keep a close eye on the skillet to achieve perfect tenderness.
-
Batch Cooking: If you have a larger family, consider doubling the recipe. Ensure your skillet can accommodate all ingredients without overcrowding to maintain that delightful texture.
-
Dealing with Sticking: Use enough olive oil or butter when browning pierogies to prevent sticking. If they cling to the skillet, they won’t get that beautiful crispiness!
-
Flavor Boosters: For extra depth, try adding a splash of chicken broth after incorporating the kielbasa and vegetables. It enhances the overall flavor of the pierogies and kielbasa skillet.
-
Garnish Wisely: Fresh herbs like parsley or chives can elevate your dish. Sprinkle a handful just before serving for that restaurant-quality finish.

Pierogies and Kielbasa Skillet Recipe FAQs
How do I choose the best pierogies?
Absolutely! Look for pierogies that are plump and have no visible tears or holes. If you’re using frozen pierogies, choose packages that are well-sealed and free from frost or ice crystals, a sign they may have been thawed and refrozen. Most importantly, always check the expiration date!
What’s the best way to store leftovers?
Very simple! Store any leftover Pierogies and Kielbasa Skillet in an airtight container in the refrigerator for up to 3-4 days. Make sure to let the dish cool completely before sealing it to avoid condensation, which can lead to sogginess. Reheating in a skillet over low heat preserves the texture beautifully.
Can I freeze Pierogies and Kielbasa Skillet?
Yes, you can! To freeze, let the dish cool and then divide it into portion-sized servings in freezer-safe containers. Seal well to avoid freezer burn and store for up to 3 months. When ready to enjoy, thaw overnight in the refrigerator and reheat gently on the stovetop with a splash of broth or water to keep it moist.
What should I do if my kielbasa is tough?
If your kielbasa turned out tough, it might have been overcooked, which can happen if the heat is too high or it’s cooked too long. Next time, cook it over medium heat, and keep an eye on the browning process. Aim for that golden exterior without letting it dry out—just a few minutes of browning should do the trick!
Can my pets share this meal with me?
While your pup might be eager for a bite, it’s best to skip sharing this dish with pets. The cheeses, onions, and spices used aren’t suitable for them. Instead, why not prepare a pet-friendly treat that they can enjoy while you savor your comforting Pierogies and Kielbasa Skillet?
Are there healthier ingredient substitutes I can use?
Certainly! If you’re looking to make your Pierogies and Kielbasa Skillet lighter, opt for turkey kielbasa or chicken sausage for a leaner protein. You can even add more veggies like spinach or zucchini for bulk and nutrients—or substitute sour cream with Greek yogurt for added creaminess without the fat. It’s all about making it your own!
Comforting Pierogies and Kielbasa Skillet in Just 30 Minutes
Ingredients
Equipment
Method
- Begin by filling a large pot with water and bringing it to a boil over high heat. Add a pinch of salt to the water for extra flavor. Once boiling, reduce the heat to medium; keep it at a gentle simmer while you prepare the other ingredients.
- In a large skillet, heat 1 tablespoon of olive oil over medium-high heat until shimmering. Add sliced kielbasa to the skillet in a single layer, allowing it to cook undisturbed for about 3-4 minutes until browned. Flip the kielbasa and cook for another 2-3 minutes until evenly browned and crispy. Remove from the skillet and set aside.
- Lower the skillet temperature to medium, and add another drizzle of olive oil if needed. Toss in sliced bell peppers and onions, sautéing them for about 10-15 minutes until tender and lightly caramelized. Remove from heat and set aside with the kielbasa.
- Carefully add the frozen pierogies to the pot of simmering water. Cook according to the package instructions, about 5-7 minutes until they float to the surface. Remove them with a slotted spoon and drain well.
- Melt 1 tablespoon of butter in the same skillet over medium heat. Once melted, add the drained pierogies in a single layer. Sauté for about 3-4 minutes until they develop a golden-brown crust. Flip to brown the other side for another 2-3 minutes.
- Return the cooked kielbasa and sautéed peppers and onions to the skillet with the browned pierogies. Toss everything together, ensuring the pierogies are coated. Cook for an additional 2-3 minutes to heat through.
- Sprinkle shredded cheddar cheese evenly over the skillet mixture. Cover with a lid and cook for about 2-3 minutes until the cheese is melted and bubbly. Remove from heat and serve warm, topped with sour cream if desired.
Leave a Reply